Welcome to the world of handcrafted rugs! Making your unique rugs by hand is not only a fun and rewarding experience but also adds charm to any space. Whether you’re a veteran crafter or a beginner looking to unleash your creativity, rug-making is an art form anyone can master. This comprehensive guide will take you through the step-by-step process of creating beautiful handmade rugs that enhance your home decor and bring warmth to your living spaces.
Key Takeaways:
- Learn the art of rug making from scratch.
- Discover different types of rug weaving techniques.
- Choose the best materials for your rug-making project.
- Create your rug design and patterns.
- Explore techniques for weaving, adding texture, and finishing your rug.
Understanding Different Rug Weaving Techniques
If you’re new to rug making, you might not be familiar with the different rug weaving techniques. Familiarizing yourself with these techniques is crucial for selecting the right approach for your project. This section will look closely at hand weaving and knotting techniques used in rug making.
Hand Weaving
Hand weaving is the most common technique used in rug making. This technique involves using a loom to weave threads together. Several steps are involved in hand weaving, including setting up the warp, weaving the weft, and finishing the rug.
Hand weaving is a versatile technique that can create various designs. This technique allows for greater control over weaving, making it ideal for intricate patterns and designs.
Knotting Techniques
Knotting is another popular technique used in rug making. This technique involves tying knots in the rug’s warp and weft threads to create the rug’s pile. Two main knotting techniques are used in rug making: the symmetrical knot and the asymmetrical knot.
The symmetrical knot, also recognized as the Turkish knot, is employed to craft more intricate and detailed designs. This knot creates a square-shaped pile that is denser and more durable than the asymmetrical knot.
The asymmetrical knot, commonly called the Persian knot, is employed to produce more straightforward designs. This knot creates a longer, more open pile that is less dense than the symmetrical knot.
By gaining insight into various rug weaving techniques, you can choose the best method that suits your project. Whether you decide to hand weave or knot your rug, both approaches offer distinct advantages that can assist you in crafting a stunning and top-quality handmade rug.
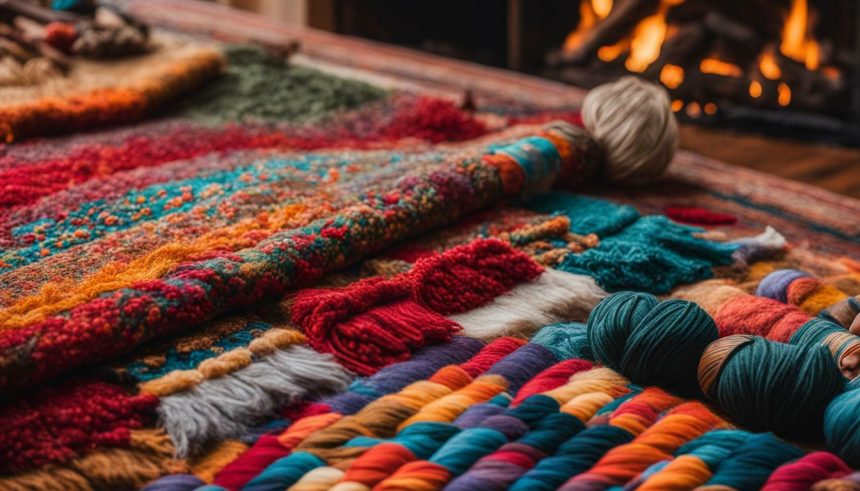
Choosing the Right Materials for Your Handmade Rug
When creating a high-quality handmade rug, selecting suitable materials is crucial. The materials you choose can impact your rug’s final appearance and durability. Here are some rug materials to consider:
| Rug Materials | Description |
|---|---|
| Yarn | Yarn is the most common material used for rug making. It comes in various colors, textures, and thicknesses, allowing you to create unique designs with your rug. |
| Fabric | Fabric can also be used in rug making, particularly for rag rugs. Look for cotton or linen fabrics in various colors to create a vibrant and eclectic rug. |
| Natural fibers | Natural fibers such as wool, jute, and sisal can add a rustic charm to your handmade rug. These fibers are also durable, making them an excellent choice for high-traffic areas. |
Consider the characteristics of each material and how they will work with your rug design. Yarn can be twisted together to create a more textured rug, while natural fibers can add depth and warmth to your rug’s appearance. Experiment with different materials and find what works best for your project.
Remember that using natural fibers or high-quality yarn can increase the cost of your handmade rug. However, the investment may be worth it in the long run, as a durable and well-made rug can last for years.
Designing Your Handmade Rug
Crafting your handmade rug is an enjoyable and imaginative endeavor that empowers you to add a personal touch to your living space. Whether you want to create a bold statement piece or a subtle accent rug, the design possibilities are endless.
Begin by selecting a design that complements your home decor and aligns with your style. You can draw inspiration from traditional rug designs or create your unique pattern. Consider the colors you want to incorporate into your rug, as they can significantly impact the overall appearance.
If you’re struggling to develop a design, try looking for inspiration in your surroundings. Take a walk in nature or browse through home decor magazines for ideas. You can also explore patterns and color combinations on paper to assess their appearance before incorporating them into your rug.
Picking the Perfect Pattern
The pattern you choose for your handmade rug can make or break the overall look of the finished product. Be sure to consider the pattern’s scale and the size of your rug. Large-scale patterns can look overwhelming in a small rug, while small-scale patterns may not have the desired impact in a larger rug.
Some popular rug patterns include geometric shapes, floral designs, and abstract motifs. You can also incorporate text or images into your rug for a unique and personalized touch.
Playing with Color
Color is pivotal in rug design, as it can evoke various moods and emotions within a given space. Consider the colors already present in your home decor and choose colors that complement or contrast with them. You can also use your rug as a statement piece by incorporating bold and vibrant colors.
If you’re unsure which colors to choose, try creating a color palette to guide your rug design. Look for inspiration in nature, art, or fashion, and choose colors that speak to you.
Unleashing Your Creativity
Designing your handmade rug is about unleashing your creativity and having fun. Don’t be afraid to experiment with different patterns, colors, and textures. You can fashion a unique rug that mirrors your style by tapping into your creativity and imagination.
Preparing the Loom for Rug Weaving
Before you begin weaving your rug, preparing the loom properly is crucial. The loom is the frame that holds the warp threads in place while you weave the weft threads over and under them to create your rug.
First, select your loom based on the rug size you want to create. Many different types of looms are available, including frame looms and floor looms. Once you have selected your loom, you must set up the warp threads.
The warp threads are the vertical threads that extend along the length of the loom, serving as the basis for your rug. To set up the warp threads, tie one end of the yarn to the top of the loom and then weave it down through the center of the loom. Continue weaving the yarn over and under the other threads until you reach the bottom of the loom.
After you have set up the warp threads, it’s important to stretch them properly. This will ensure that your rug has a stable foundation and that the tension is even across all the warp threads. Begin by tying the yarn at the bottom of the loom to a weight or clamp, then use a tensioning device to stretch the warp threads evenly.
You can start weaving your rug once your loom is set up and the warp threads are appropriately stretched.
Rug Weaving Techniques: Step-by-Step Instructions
Now that you have familiarized yourself with the different rug weaving techniques and chosen the suitable materials for your project, it’s time to dive into the weaving process. Whether you’re using a floor loom, a table loom, or a hand-held loom, the basic steps of rug weaving remain the same.
Step 1: Set up your loom and stretch the warp threads. This will create the foundation for your rug and ensure it remains stable during weaving.
Step 2: Once the warp threads are in place, it’s time to start weaving. This usually entails passing the weft yarn over and under the warp threads, resulting in a firm and robust weave.
Step 3: As you weave, be sure to keep the tension of the weft yarn consistent to avoid any sagging or unevenness in the finished product.
Step 4: Depending on the type of rug you’re making, you may need different knotting techniques to create specific patterns or textures. Experiment with different knotting methods, such as Turkish or Persian knots, to achieve the desired effect.
Step 5: As you near the end of your rug, it’s essential to take care of the final weaving rows. These will create the finishing touches to your rug and should be completed carefully to ensure a polished and professional look.
Rug Knots
One of the most critical aspects of rug weaving is understanding the different types of knots used to create specific patterns and textures. Some of the most common knots used in rug making include:
- The Turkish knot: This knot is also known as the Gordes knot and is commonly used in Turkish rugs. It involves looping the yarn around two adjacent warp threads and then knotting it around the back thread.
- The Persian knot: This knot is used in Persian and Oriental rugs and involves looping the yarn around a single warp thread and then knotting it around the adjacent warp thread.
- The Soumak knot is a little more complex and involves wrapping the yarn around groups of warp threads to create a braided effect.
Experiment with different knotting techniques to create unique patterns and textures in your handmade rug. With some practice and patience, you’ll soon master the art of rug weaving and be on your way to creating beautiful and personalized rugs for your home.
Adding Texture and Depth to Your Rug
Creating a visually appealing rug involves choosing the right design and colors. Texture and depth are essential elements that elevate your rug from ordinary to extraordinary. In this section, we will explore different techniques for adding texture to your rug, such as pile height and loop pile, as well as cut pile, that will give your rug a tactile feel.
Experiment with Pile Height
Pile height pertains to the length of the yarn utilized in your rug. This technique involves adding layers of yarn in varying lengths to create a plush, three-dimensional effect. A high pile height creates a shaggy, comfortable rug, while a low pile height creates a sleek, modern look.
Consider your rug’s purpose when deciding on its pile height. A high pile height is well-suited for cozy areas like bedrooms and living rooms, while a low pile height is excellent for high-traffic areas like entryways and kitchens.
Try the Loop Pile Technique
Another way to add texture to your rug is to use the loop-pile technique. This technique involves creating loops of yarn and using a unique tool to secure them. Loop pile creates a sturdy, textured surface that is great for high-traffic areas.
The loop pile method is highly adaptable, allowing diverse patterns and textures to be created. Explore the possibility of employing different yarn colors and textures to craft a distinctive design that complements your style and home’s aesthetic.
Experiment with the Cut Pile Technique
Cut pile is another technique that can add texture and depth to your rug. This technique involves cutting the loops of yarn to create a plush, velvety texture. Cut pile is great for creating intricate patterns and designs and provides a luxurious feel underfoot.
Cut pile can also be combined with loop pile to create more depth and texture in your rug. Experiment with different combinations of pile techniques to create a unique look and feel for your rug.
By incorporating these techniques into your rug-making, you can create a visually appealing and tactile rug that will add charm and warmth to any space in your home.
Finishing Touches: Binding and Edging Your Rug
Congratulations, you’ve finished weaving your rug! Now, it’s time to finish it professionally with binding and edging. This process not only prevents fraying but adds durability to your handmade rug.
Rug binding: Binding is wrapping a narrow strip of fabric or leather around the edges of your rug to prevent it from fraying. You can use binding tape or bias binding, a strip of fabric cut on the bias to allow for a smooth and even finish.
Rug edging: Edging gives your rug a polished look. You can use a simple overcast stitch to encase the edges of your rug or create a decorative edge using different stitching techniques. A popular edging technique is the whip stitch, which creates a braided effect around the edge of your rug.
Choosing a binding and edging style that complements your rug design is essential. You can select a contrasting color to make your rug visually striking or use a more subdued hue that harmonizes with your design.
Remember always to use a solid and durable thread when completing your binding and edging. A well-bound and edged rug will prevent fraying and prolong the life of your handmade creation.
Cleaning and Maintenance Tips for Handmade Rugs
Your handmade rug is a cherished piece of home decor that requires proper care and maintenance to ensure it remains in top condition for years to come. Adhere to these care and cleaning recommendations to ensure your rug remains in top condition:
Regular Vacuuming
Regularly vacuum your rug to avoid the buildup of dust, dirt, and particles within its fibers. Use a low-power vacuum or attachment to prevent damage to the rug’s pile or weave. For rugs with fringe, use the vacuum’s suction feature and avoid using the vacuum cleaner on the fringes to prevent tangling.
Dealing with Spills and Stains
Accidents happen, and spills or stains can be tricky to remove from a handmade rug. Act quickly to blot up any spills with a clean cloth or paper towel, being mindful not to rub the stain further into the rug’s fibers. Consider using a blend of white vinegar and water for persistent stains, or seek advice from a professional carpet cleaning service.
Rotate Your Rug
To prevent uneven wear and fading, rotating your rug every few months is advisable. This will also prevent furniture marks from forming on the rug’s surface.
Avoid Direct Sunlight
Direct sunlight can lead to fading and deterioration of your handmade rug. Refrain from situating it in spots that might be subjected to extended sunlight exposure, or employ window coverings to filter out UV rays.
Professional Cleaning
It is advisable to seek professional cleaning every few years to eliminate embedded dirt and stubborn stains effectively. Search for a professional rug cleaning service specializing in handmade rugs and employing gentle cleaning techniques that won’t harm the fibers or colors.
Following these rug care and maintenance tips, you can keep your handmade rug looking beautiful for years.
Showcasing Your Handmade Rug: Styling and Display Ideas
Your handmade rug is a stunning piece of art that deserves to be displayed and appreciated. Here are some styling and display tips to help you showcase your rug in your home decor:
- Create a Focal Point
Use your rug as the center of attention in a room by placing it in a prominent location. This can be in the middle of the living room, under the dining table, or at the foot of your bed. Ensure the rug’s colors and patterns complement the surrounding furniture and decor.
- Layer Your Rugs
Layering rugs is a trendy way to add depth and interest to your space. Place your handmade rug over a more significant, neutral rug to create a striking contrast. This works well in living rooms and bedrooms.
- Hang Your Rug
If you have a smaller rug or a tapestry, consider hanging it on the wall to create a unique piece of art. Use a rug hanger or rod to display your rug, and ensure it’s securely fastened.
- Use Your Rug as a Runner
Long, narrow rugs can be used as runners in hallways or entryways. This adds a pop of color to your space and protects your floors from dirt and wear.
- Incorporate Textures and Patterns
Combine various textures and patterns to craft a visually captivating and unified appearance. For example, pair your handmade rug with textured throw pillows and blankets in coordinating colors.
- Switch Up Your Rugs
Don’t be afraid to switch up your rugs and experiment with different styles and designs. Rotate your rugs periodically to keep your space feeling fresh and new.
By adhering to these styling and display concepts, you can fashion a striking and uniquely personalized space that highlights the beauty of your handmade rug. Integrate your handmade rug into your home decor and relish the warmth and charm it brings to your living spaces.
Selling or Giving Your Handmade Rugs as Gifts
Once you’ve honed your rug-making skills, you may want to share your beautiful creations with others. Whether you’re looking to start a home-based rug business or gift your handmade rugs to friends and family, there are a few things to remember.
Selling Handmade Rugs
If you’re interested in selling your handmade rugs, there are several avenues to explore. You have a range of possibilities, including creating an online shop, selling your rugs at craft fairs or markets, or reaching out to local businesses to suggest selling your rugs on a consignment basis.
Research the market to determine pricing and demand, and create a social media presence to showcase your work. Consider joining a local craft or artisan guild to network with other makers and gain exposure for your business.
Gifting Handmade Rugs
Handmade rugs make excellent gifts for loved ones, and the personal touch of a handmade item is always appreciated. Consider the recipient’s style and color preferences when choosing a design, and personalize your rug with their initials or a special message woven in.
If you’re short on time, you can also gift a rug-making kit, which includes all the materials needed to create a beautiful rug. This thoughtful and unique gift allows the recipient to unleash their creativity and make something special for their home.
Starting a Home Business
If you’re passionate about rug making and want to turn it into a full-fledged business, there are several things to consider. You’ll need to research business regulations in your area, including any necessary licenses and permits.
You’ll also need to develop a business plan, including pricing, marketing, and production strategies. Consider offering custom designs and a range of sizes and materials to appeal to a broader customer base.
Rug-making can be a fulfilling and lucrative business venture, but it requires dedication, hard work, and a love for the craft.
Start Your Creative Journey in Rug Making Today
Congratulations on completing this extensive guide on crafting rugs by hand. You now have the knowledge and skills to embark on your rug-making adventure. Harnessing your creativity and unwavering determination, you can craft exquisite, one-of-a-kind handmade rugs that infuse warmth and character into any area of your home.
Don’t be afraid to experiment with different materials, colors, and designs to express your style and personality. Remember that rug making is an art form that requires patience and practice, but the result is always rewarding.
Find Inspiration
Before you begin your first rug project, take some time to explore different rug designs and techniques. You can find inspiration in traditional rug patterns or create your unique designs. Check out online resources, such as blogs, forums, and social media platforms, for ideas and tips from other rug makers.
Invest in Quality Materials
In the realm of handmade rugs, the quality of the materials you employ will directly influence the result. Invest in high-quality yarn, fabric, and natural fibers that are durable and easy to work with. Not only will this result in a better-looking rug, but it will also save you time and frustration in the long run.
Practice Your Technique
Rug-making requires practice and persistence. Don’t be discouraged if your first few attempts don’t turn out perfectly. Keep practicing your weaving technique and experimenting with different patterns and textures. You’ll become more skilled and confident in your abilities with time and practice.
Showcase Your Handiwork
Once you’ve completed your handmade rug, display it proudly in your home. There are many ways to showcase your new creation, such as laying it on the floor in a prominent area or hanging it on a wall as a decorative accent. Your unique rug will surely catch the eye of all who see it.
So what are you waiting for? Grab your loom, select materials, and start your creative journey in rug making today. With your imagination and determination, you can create beautiful, one-of-a-kind rugs that will be cherished for years.