Welcome to this comprehensive guide on how to make punch needle rugs! Whether you’re a beginner or have some experience with punch needle embroidery, this guide will provide you with step-by-step instructions to help you create beautiful rugs from start to finish. With the right tools and materials, you can unleash your creativity and add a personal touch to your home decor.
Key Takeaways:
- Punch needle rugs offer a unique and personal touch to home decor
- With the right materials and techniques, anyone can create a beautiful punch needle rug
- Properly setting up your frame and mastering the punch needle technique are essential steps in the process
- Adding colors and textures allows for endless creative possibilities in punch needle rug making
- Properly finishing and caring for your rug will ensure its longevity and maintain its beauty
Understanding Punch Needle Rug Making
If you’re new to punch needle rug making, it’s essential to understand the basics to achieve a beautiful result. Punch needle rug making is a form of embroidery that involves using a special needle to punch loops of yarn through a fabric backing. This creates a plush, textured rug that can be customized to fit any design, color scheme, or size.
To get started with punch needle rug making, you’ll need the proper tools and materials. Here are some of the basics:
| Tools | Materials |
|---|---|
| Punch Needle | Monk’s Cloth or Other Fabric |
| Punch Needle Frame (also known as a hoop or stretcher bar frame) | Yarn (preferably wool or acrylic) |
| Scissors | Embellishments (optional) |
When selecting yarn, choose one that’s thick enough to create a plush texture but not so thick that it’s difficult to punch. Wool and acrylic yarn work best for punch needle rug making because they are durable and easy to use.
Before starting your punch needle rug, it’s important to prepare your fabric backing. Monk’s cloth is the most commonly used fabric for punch needle rugs because it’s a sturdy, even-weave fabric that makes it easy to punch the needle through. However, other fabrics such as burlap or linen can also be used.
The next step is to set up your punch needle frame. This will hold your fabric taut and even, making it easier to punch the needle through. You can use a hoop, stretcher bar frame, or any other type of frame that is suitable for your project.
Once your frame is set up, you can begin punching your rug using the punch needle technique. There are a variety of stitches you can use, including the loop stitch, the flat stitch, and the pile stitch, to achieve different textures and patterns in your rug. Practice and experimentation will help you find the technique that works best for you.
Finally, when finishing your punch needle rug, it’s important to secure any loose ends and give it a good blocking to ensure it lays flat and looks its best. With these basic steps and some practice, you’ll be on your way to creating beautiful punch needle rugs that add a personal touch to your home decor.
Choosing the Right Design and Pattern
Choosing the right design and pattern for your punch needle rug is essential to achieving the desired look and feel. Your choice of pattern will set the tone for your rug and impact its overall aesthetic.
When considering a design, think about your personal style and the existing decor in your home. Do you prefer bold and vibrant patterns, or something more subtle and understated? Consider the colors that will complement your home’s color scheme, and the types of textures and materials that will work best in the space.
One great idea for choosing a design is to look for inspiration online. Numerous websites offer free patterns and designs created by other punch needle rug makers. You can also find inspiration on social media platforms like Pinterest and Instagram.
Once you have a design in mind, it’s time to select a pattern that suits your skill level. For beginners, simpler patterns with fewer colors and details are recommended. As you become more comfortable with the punch needle technique, you can experiment with more complex designs and patterns.
Remember, the design and pattern are important, but ultimately, the most important thing is that you enjoy the process of creating your punch needle rug. So choose a design that sparks joy and allows you to unleash your creativity!
Now that you have selected your design and pattern, it’s time to move on to setting up your punch needle frame.
Setting Up Your Punch Needle Frame
Before you can begin punching your rug, you need to set up your punch needle frame. This will secure your fabric and create the proper tension for even stitching. Follow these steps for a successful setup:
- Choose a sturdy frame: Look for a frame that is sturdy enough to withstand the tension created by pulling the fabric taut. A lap frame or a floor stand with adjustable height are good options.
- Attach your fabric: Cut a piece of fabric to fit your frame, leaving a few inches of extra fabric on all sides. Position the fabric over the top of the frame and use tacks or clamps to secure it in place. Make sure the fabric is pulled taut but not stretched out of shape.
- Adjust the tension: You want your fabric to be taut enough for even stitches, but not so tight that it distorts the weave. Use the adjuster knobs on your frame to create the desired tension. Test the tension by punching a few stitches on the fabric. If the stitches are too tight or too loose, adjust the tension accordingly.
With your punch needle frame set up and ready to go, you can now move on to the next step in creating your beautiful punch needle rug.
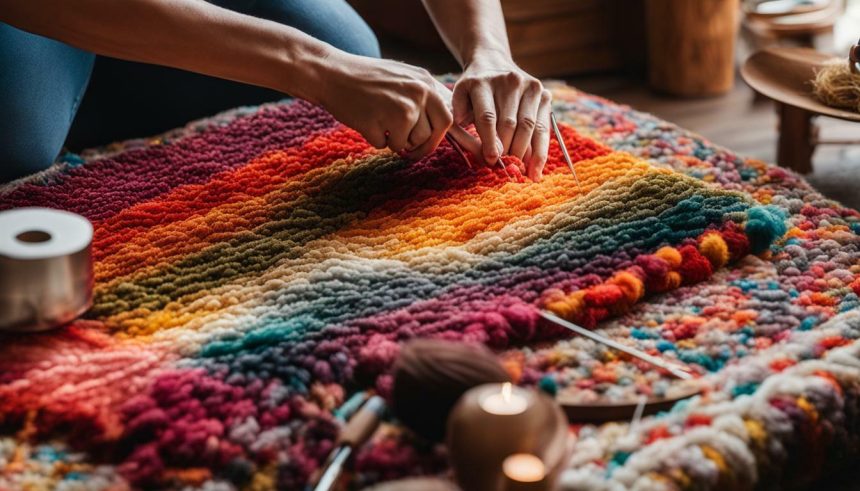
Mastering the Punch Needle Technique
Now that you have all the necessary tools and materials, it’s time to start practicing the punch needle technique. This technique involves using a special tool called a punch needle to create loops of yarn on a stretched fabric. The result is a textured rug with a unique look and feel.
Before you begin, make sure to master the basic punch needle stitch. Start by threading your punch needle with the desired yarn, making sure the tail is long enough to secure later. Hold the punch needle like a pencil and insert it into the fabric. Push it all the way through until the loop comes out on the other side.
Next, pull the punch needle back up, making sure the yarn stays in the loop. Keep repeating this technique to create rows of loops. Remember to keep the tension even, and do not pull too hard or the fabric may tear.
You can create different stitches by adjusting the height of the loops. A shorter stitch will result in a denser texture, while a longer stitch will create a more open and airy feel. Experiment with different stitch lengths to find the desired effect for your rug.
As you work, periodically check the back of the fabric to make sure the loops are even and consistent. If you notice any areas of unevenness, gently tug on the yarn to adjust the tension.
Finally, once you have completed a section of your rug, it’s important to secure the ends of the yarn. To do this, tie a knot at the end of the yarn tail, trim any excess yarn, and secure the knot with a dab of fabric glue. Repeat this process on the opposite side of the fabric to ensure the rug is sturdy and durable.
Adding Colors and Textures to Your Rug
One of the most exciting aspects of making punch needle rugs is the ability to play with colors and textures. With a wide range of yarn options, you can create unique patterns and textures that will make your rug stand out. In this section, we will explore different techniques to help you add colors and textures to your punch needle rug.
Choosing the right colors
When selecting colors for your rug, consider your personal style and existing home decor. You can choose to create a monochrome rug or incorporate a variety of colors. Experiment with different hues and shades to create a unique and visually appealing design.
Blending yarns
A great way to add depth and texture to your rug is by blending different types of yarns. You can use a combination of materials such as wool, acrylic, or cotton to create a more complex texture. To blend yarns, simply hold them together while punching and adjust the needle depth as needed.
Choosing different needle depths
Another way to create texture in your rug is by varying the depth of the needle. You can achieve a range of heights and textures by adjusting the needle depth. Using a shallow needle depth will create a flat surface, while a deeper depth will create a more plush texture.
Incorporating different punching techniques
There are different punching techniques you can use to create unique patterns and textures in your rug. For example, you can use the loop stitch to create a raised texture or the flat stitch to create a flat surface. You can also experiment with different stitch patterns to create more complex designs.
Playing with pattern
While color and texture can make a big impact on your rug, a well-chosen pattern can also take your design to the next level. There are various punch needle rug patterns available online, or you can create your own. Don’t be afraid to mix and match different patterns to create a truly unique rug.
Finishing and Care for Your Punch Needle Rug
Congratulations on completing your beautiful punch needle rug! Now it’s time to give it the finishing touches it deserves to make sure it lasts for years to come. Here are some tips on how to properly finish and care for your punch needle rug.
Securing Loose Ends
Before you do anything else, make sure all loose ends are securely fastened. Use a needle and thread to knot the ends and weave them back into the rug. Trim any excess yarn carefully to ensure a neat finish.
Blocking the Rug
Blocking your rug will help to flatten any uneven areas and ensure it stays in shape. First, wet the rug and lay it out flat on a clean surface. Gently stretch it to the desired size and shape and use pins to hold it in place. Leave it to dry completely before removing the pins.
Cleaning and Maintenance
To keep your punch needle rug looking its best, it’s important to clean and maintain it regularly. Vacuum it every week to remove any dirt or dust that may have accumulated. If there are any spills or stains, spot clean them immediately with a mild detergent and warm water. Never rub the stain, as this could damage the rug.
If your rug needs a deeper clean, take it outside and shake it vigorously to remove any loose dirt. Then, use a carpet cleaner to deep clean it. Follow the instructions on the cleaner carefully and make sure the rug is completely dry before using it again.
By following these simple tips, you can ensure your punch needle rug stays looking beautiful for years to come. Enjoy your new creation and feel proud knowing you made it yourself!
Conclusion
Now that you have learned the basics of punch needle rug making, it’s time to get started on your own rugs! Remember, the key to success is taking your time and practicing the technique. Don’t be afraid to experiment with different designs, colors, and textures to create a rug that is truly unique.
With your new skills, you can easily make punch needle rugs that will add a personal touch to your home decor and make great gifts for friends and family. So gather your tools and materials, set up your punch needle frame, and let your creativity run wild!
Share Your Creations
We would love to see your finished punch needle rugs! Share your creations with us on social media using the hashtag #PunchNeedleRug. Who knows, you may inspire others to try this fun and rewarding craft!